
Facebook is a top platform for reaching your audience, especially for those in the bowling and entertainment business. It gives you direct access to customers, gives them a space to talk back to you, and for the most part it’s free.
But with Facebook’s updated algorithm, It’s not enough to share the usual posts and hope they organically spread. In order to guarantee your messages are put in front of your customers you need to spend money with Facebook Ads.
Paid Social Options for Every Budget
Fortunately, Facebook ads allow you flexibility to set your own price. The ads can be stopped, changed, or paused at anytime, and the audience is completely customizable. Facebook Ads also come with robust reporting that lets you see whether your ads are performing at their full potential.
Your first time navigating the platform and setting up ads can be confusing, so we’ll walk you through the basics so you can start your own successful Facebook Ad campaign.
How to Set Up Bowling Center Facebook Ads
Before you set up your Facebook ads, you need to know your objective. What are you trying to accomplish by publishing a Facebook ad for your bowling center? Are you trying to get more page likes? Are you offering a discount and collecting contacts on a form? When using Facebook ads to promote the offer, there are several different methods you can use.
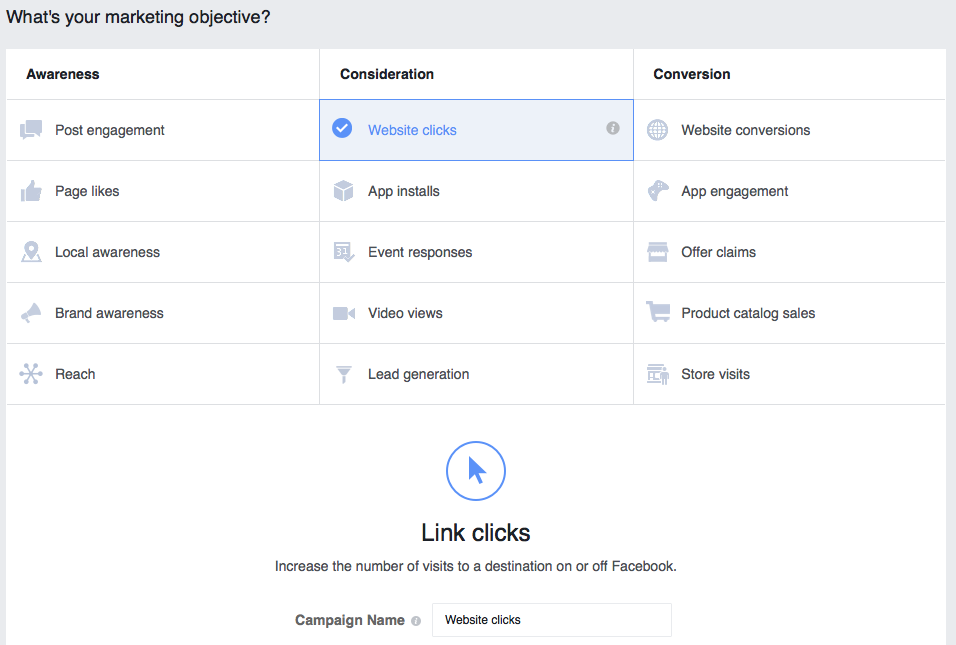
Facebook makes it easy to apply your objective to the ad by offering three objective categories, Awareness, Consideration, and Conversion. Each category breaks down to 5 subcategories, seen in the image below.
An easy and effective method we suggest to beginners is the Website Clicks objective under the Consideration category. We like to use this one when clients offer a discount for a birthday party to send customers to a landing page. With this objective, Facebook shows your ad to users who are most likely to click the link in your ad. Be sure to name your campaign so it’s relevant to your ads.
Create the audience for your Facebook Ads
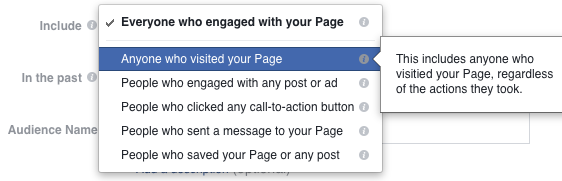
Once you’ve chosen the objective, it’s time to create an audience. Facebook now lets you create custom audiences. This allows you to target users who have interacted with your page, either by visiting it, saving your post, liking or commenting, and more. This is a preferred option because it’s easier to advertise to people who already like you (and your Facebook page)! Try starting with an audience of anyone who visited your page. It’s a broad audience, but you know you are retargeting users who are familiar with you already.
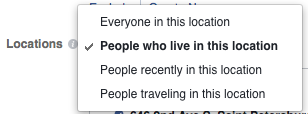
The next section, Location, narrows your audience down even further. This is often overlooked, but it’s very important! For our birthday party discount example, we only want to target people who live near the venue. You can add your exact address and target people within a specific radius of your location.
Now you’ll adjust the age range and gender of your audience, if you want. We don’t suggest changing any default settings for Languages, Detailed Targeting or Connections until you’re more familiar with Facebook advertising.
Choose the placement of your Facebook Ads
Make sure your ads are shown to the right people in the right places. Here, let Facebook do the work! Choose Automatic Placements and Facebook will automatically show your ads to your target audience in the places they’re likely to perform best. With this option, your ads might be placed on Facebook and Instagram for the Website Clicks objective. For example, if you target a young audience, your ad is more likely to show up on Instagram, but for an older audience it’s more likely to show up on Facebook.
Select a budget and schedule
Finally, choose your budget and schedule.
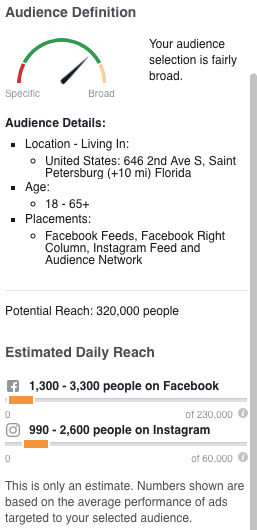
Keep an eye on the right column to see an estimation of how many people your ad will reach based on the length of time and money invested. If you feel like your reach is too broad or too specific, adjust your settings and check again. Only adjust one setting at a time to see exactly how much it moves the needle. We also recommend you set an end date for your ads in case you forget to check back to stop it.
Creating Your Facebook Ad
Now it’s time to create how your Facebook Ad will actually look.
First, pick your format. According to recent studies, Facebook video ads outperform image ads. This doesn’t mean your image ads won’t attract leads, but if you have resources and access to video software (we like Animoto), use it!
In the next step, upload your media. If you’re using images, you cannot use more than 20% text. Facebook prefers that you put any copy you want to use in the text box, not the image. If you have any doubts on whether your image complies, use Facebook’s Image Text Check tool to be sure. If you don’t have access to a design team or to stock photos, Facebook gives you some free options.
If you’ll be designing your ad yourself, pay attention to the ad specs. These sizes are always changing, so use a good resource to stay up-to-date on Facebook ad sizes.
Connect your Facebook page and Instagram account so your ads will show up. Add the URL you want to direct your ad traffic to. Don’t send your audience to your homepage. The best type of landing page for an ad is very specific to your ad, and has no menu and no links. You want to keep users focused on the reason they clicked your ad in the first place. Include a lead capture form as well, otherwise you’re missing out on precious information – the entire purpose of your ad!
Creating copy for your Facebook Ad
Now, talk to your audience. You’ve chosen a specific group of people to show your ad to, so speak in a way that they will relate to. Write a headline that will captivate and a description that will entice them to click. Choose a Call to Action that makes sense with your ad, which displays as a button. We like the Learn More button for most ads because it doesn’t make users feel like they are required to give too much information about themselves (that’s what the landing page is for!).
Now you can preview your ad on different platforms, like Desktop News Feed, Feature Phone, and Instagram Feed. You’ll be able to see if you need to adjust anything. Once you’ve reviewed your ad and are satisfied with how it looks, place your order!
Monitor your ad and watch the results
Now that your ad is live, keep an eye on it. Are you happy with the results? If not, you can always change the ad copy, or even cancel it.
Need Help? Contact us. We'll be happy to discuss Facebook Ads with you.